CMPT 201 Westminster
Lab 2: Turtles
Due
on January 27, 2024
How Labs are Managed and Graded
- Select a partner on your own. Try to pair with a new partner each week.
- You will work together on one computer for the first part of lab, and work separately (but collaboratively) on multiple computers towards the end of lab.
- Each partner will submit the lab separately. (Submission instructions are described later in this lab.)
- If you do not finish the lab during the lab period, you may either get together outside of class to complete it, or complete it on your own. If you choose to complete it on your own, be sure to indicate this in your submission.
Objectives. The objectives of this lab are
- To gain an initial understand of objects and methods in
Java using the Turtle class
- To gain more practice invoking methods
- To define your first class
Step 1: Create a Turtle Java file
If you just completed the in-class activity, you should already have correct access to the bookclasses zip file, as well as the correct classpath in jGRASP. If you haven't already done so, install this file on your personal computer as well as set the jGRASP classpath. See the Software Installation page for instructions.
For this lab, you will be modifying two files:
- Turtle.java
- Lab2.java
Next, in jGRASP, create a New > File > Java, and copy and paste the code from Turtle.java into the new Java file. Save Turtle.java into your CMPT-201 Lab 2 folder.
Compile the program (but do NOT run the program yet, because it does not have a main method).
Step 2. Create a Lab2 Java file to test your code
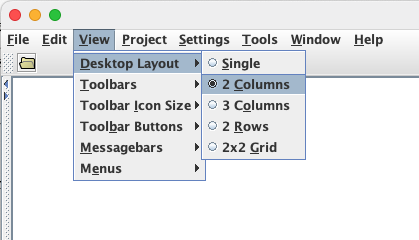
In jGRASP, change the layout so you can view two files at once, by selecting (View -> Desktop Layout -> 2 Columns)
In the new window, folder, start a second new Java class and call it Lab2.java. (File -> New -> Java). Name your class Lab2 and type the following into Lab2.java:
public class Lab2 {
   public static void main(String[] args) {
   }
}
Compile your program and save it in your Lab2 folder. It should now run without errors, but it will not do anything yet.
Step 3. Create a Turtle (in Lab2)
In this lab, we will be writing on a screen by using turtle objects. Each turtle has a pen in the middle of it that can be raised and lowered to leave a trail of its movements. Turtles know how to move foward, turn left, turn right, and turn by a specific angle.
In the main method of your Lab2 class, type (or copy and paste) the following sequence of Java statements.
// declare variables
World world;
Turtle turtle1;

// initialize variables
world = new World();
turtle1 = new Turtle(world);

// manipulate turtle1
System.out.println(turtle1);
turtle1.forward(100);
turtle1.turnRight();
turtle1.forward(100);
turtle1.turnRight();
turtle1.forward(100);
turtle1.turnRight();
turtle1.forward(100);
System.out.println(turtle1);
One member of your pair should create a copy of this document and share it with ProfessorHelen@gmail.com and your lab partner. Answer the following questions in your Lab 2 Notes document:
- What shape is drawn by the turtle?
- What are the coordinates of the turtle at the end?
- Which direction is the turtle facing at the end?
- What statement would you add to the end of the main method to make the turtle face in the same direction as it started? Try it to make sure it works.
Step 4. Create multiple turtles (in Lab2)
Comment out /* */ or delete the previous sequence of commands.
Enter the following sequence of statements in the main method:
World world;
Turtle turtle1, turtle2;   // can declare multiple variables if same type
world = new World();
turtle1 = new Turtle(world);
turtle1.turn(45);
turtle1.forward(120);
turtle2 = new Turtle(60,60,world);
turtle2.turn(135);
turtle2.forward(240);
We are moving the turtles by sending messages (using methods) to your turtle objects and asking them to do things. The full syntax for sending a message to an object is:
objectReference.method(parameterList);
The objectReference is a reference to an object, method is what we want the object to do, and parameterList is any additional information that more fully describes what we want the object to do. The parenthesis '( )' and semicolon ';' are required even if there is no parameter list.
Answer these three questions in your Lab 2 Notes document:
- What Java statements will tell you the coordinates and direction of turtle1 and of turtle2? (Hint: if you're not sure, review the code from Step 3.)
- What Java statement(s) move turtle1to the same coordinates as turtle2? If you're not sure, refer to page 16 in your light blue booklet. Try it!
- Objects in Java should refuse to do what you've asked them to do, when you ask them to do something that would cause their data to be wrong. For example, a Turtle object should not go past the end of the world. The world that the world is in is 640 by 480. What happens if you try to get turtle1 to move off the screen?
Step 5. Use a length variable (in Lab2)
Comment out or delete the previous sequence of commands. Next, enter the following sequence of statements in the main method:
// declare variables
World world;             // declare variables
Turtle turtle1;
int length;
// initialize variables
world = new World();
turtle1 = new Turtle(world);
length = 40;
turtle1.turn(-30);         //  last 9 lines start here
 turtle1.forward(length);
 turtle1.turn(180);
 turtle1.forward(length);
 turtle1.turn(-120);
 turtle1.forward(length);
 turtle1.turn(180);
 turtle1.forward(length);
 turtle1.turn(150);
By using a length variable, you could draw exactly the same figure but larger by resetting length to 80, and then cutting and pasting the last nine lines (which appear in red) from the above code example. Try it!
length = 80;
Here is a list of all the actions that Turtles already know how to do (in other words, all the methods already defined for a Turtle). A shorter list of methods appears in your light blue booklet, starting on page 16. You will notice some of these methods (like forward) require parameters (additional information) while others do not (like turnRight). In both cases, you will always include the parentheses ( ) following the name of the method.
Step 6: Context Question: Assumptions When Giving Directions
Using Google, search for driving directions from Westminster to somewhere else (your house, a favorite restaurant, etc.). Discuss for two minutes all the assumptions we are making when we expect someone to be able to follow the Google driving directions. Write down at least one assumption in your Lab 2 Notes document:
Step 7. Teach Turtle how to write a letter (in Turtle)
So far, our Turtle already knows how to do a limited set of actions. Just as you can teach someone to follow directions if they don't know how to yet, we can also teach the Turtle new actions. Instead of typing these lines directly into the main method, we can define our own method for every Turtle! For example, we could teach a turtle how to write all the letters of the alphabet by writing 26 new methods, one for each letter. Each method will know how to draw a single letter.
Methods are named blocks of commands that are defined inside a class definition.
Switch to your Turtle.java file in jGRASP. You will first see a number of methods called Turtle - these are called constructors and are used when you create a new object of the class. We will discuss constructors later in the course. Scroll down in the Definitions pane until you see line 52:
////////////////// methods ///////////////////////
You will type your new method definitions just below the line you just located (start on line 54).
- Add writeV as a new method in the Turtle class. This method will begin:
    public void writeV(int length) {
        // teach this Turtle to write an V
    }
where the parameter length indicates the length of the lines in the figure.
The open and close curly braces { } mark the beginning and end of a method.
Before proceeding to the next step, make sure your Turtle program compiles!
- Copy the last nine statements from Step 5 into your writeV Because length is a parameter to the method meaning its declaration already appears inside the parenthesis. Otherwise, the code should be similar.
- Replace all instances of the word turtle1 with the word this.
All Turtle objects will be following these instructions, so you cannot use a specific variable name in your method definition (i.e. the variable name turtle1). The method has to work for any Turtle object that it is invoked on (for example, a Turtle object referenced by a variable turtle2). So, you need to use the special Java keyword this, which refers to the object that the method will be invoked on.
- Compile Turtle, and make sure your code compiles. (Run will not work quite yet.)
Step 8. Ask the Turtle to write a letter (in Lab2).
Switch from Turtle.java to Lab2.java in jGRASP.Replace your main method in Lab2:
    public static void main(String[] args) {
        // create a World


        // create a Turtle


        // ask your Turtle to write a smaller V first


        // then ask your Turtle to write a larger V

    }
In the main method, add Java code to create World and Turtle objects (just as you did in Steps 3-5) and try writing the letter V by calling the writeV method you just wrote, such as turtle.writeV(40);
Compile and run your code. Don't proceed to the next step until your Turtle draws a V!
Step 9: Planning a Algorithm
On a piece of paper or in your Lab 2 Notes, come up with a list of methods you can call to define a new method: writeX. Try to come up with an algorithm that uses writeV.
If you wrote your plans on paper, take pictures of it and insert the picture in your Lab 2 Notes.
At this point, show Helen your plan before proceeding to the next step.Step 10. Teach Turtle how to write an X (Turtle).
You can begin by experimenting in Lab2.java. Try calling your writeV method multiple times from the main method to draw an X using a single Turtle. If you wanted an X 40 pixels long, what length parameter needs to be passed to writeV? (Hint - the correct choice of the value of length is the key to getting this to work correctly.) Revert back to your original main method after you figure this out.
Once that works, switch back to Turtle.java and write the method in Turtle:
    public void writeX(int length) {
        // teach this Turtle to write an X by calling the writeV method
    }
Place this writeX method just below your writeV method. Inside your writeX method, you should call the writeV method. DO NOT COPY AND PASTE all the code from your writeV method.
Your writeX method should be fewer than five lines if written correctly. Ask for help if yours is longer than five lines.
Compile Turtle, and fix any errors.
Step 11. Ask Turtle to write an X (Lab2).
Switch back to the main method in Lab2. Test your new method (by creating adding a call to writeX to the main method in Lab2).To prevent the letters appear on top of each other, you will want to add code in the main method to direct the Turtle to move between writing the different letters. You should not need to modify the writeX or writeV methods! Instead, have your Turtle re-position itself in the main method.
For example, you could use the following code if you replace x and y with the desired starting coordinates:
      // move turtle1 to a new position (x, y)
      turtle1.penUp();
      turtle1.moveTo(x, y);
      turtle1.penDown();
After you are sure both writeV and writeX are working correctly, modify your code so it is printing two V's (one larger, one smaller) and two X's (one larger and one smaller). Then add your names and a description as a Javadoc comment at the top of the Lab2 file:
/**
 * Lab 2.
 * Description:
 *
 * @author
 */
When you get your code working, you can show Helen your code or you can upload your code to Gradescope to see if it passes the tests.
Challenge. Write
a third method & make length the height of the letter (for all three
methods).
Ask Helen which letter you should work on. (If you'd like to do this after class, send Helen a Discord message.) Each partner will have a different letter. Design an algorithm for how to write the letter and write down the pseudocode in your Lab 2 Notes. Each of you should code your own method.
Turtles don't really know how to draw curves, so your letters will look more like numbers from a digital clock.
You may have noticed that the letters are not drawn at the same height. This happens because the Turtle begins in a different place for each of the letters. To earn an Exemplary grade, modify your methods so that the Turtle always begins at the bottom-left of the letter. In your notes, explain how you made each letter draw the same size.
Lab Handin
Double-check that your Lab2.java has:
- comments (with your names and a description of the program)
- two calls to writeV (one larger V and one smaller V)
- two calls to writeX (one larger X and one smaller X)
Then upload your Lab2.java and Turtle.java to Gradescope.
Then go to Canvas and click on Start Assignment to provide the URL to your Lab 2 Notes and rate your partner in the textbox. Your rating should be on a scale of 5-100, based on the following questions:
- Did your partner read preparatory materials before
coming to the scheduled lab? (1-20)
- Did your partner do his or her fair share of the work?
(1-20)
- Did your partner cooperatively follow the pair
programming model (rotating roles of driver and navigator)? (1-20)
- Did your partner make contributions to the completion
of the lab assignment? (1-20)
- Did your partner cooperate? (1-20)
If you were completely satisfied with the process, you should give your partner a score of 100, and you can just provide the single number.
If you were not satisfied with the process, please provide a breakdown of your partner's rating, and elaborate (in as much detail as you wish) on your experience.
If you forget to upload any portion, or if you find and fix errors in your program after your submission but before the deadline, you may submit your lab again.