|
The content of this page is directly from B&H Photo
Large Format, Part 1
Introduction
to Large Format, Part II
Contents
-
Movements
introduction
-
Basic
Swing and Tilt Operations
-
1.
Rise and Fall
-
2.
Shift
-
3.
Swing
-
4.
Tilt
-
Vertical
Perspective Control
-
Horizontal
Perpective Control
-
Vertical
Image Placement
-
Horizontal
Image Placement
-
Depth-of-Field
Control
Movement
The
principal features that set view cameras apart from all nonadjustable cameras
are the cameras movements. In a nonadjustable camera, the relationship
of the lens to the film plane is fixed and permanent; other than switching
from one lens focal length to another, or changing your camera position,
fixed cameras offer you little actual control over image manipulation.
A view camera,
on the other hand, allows you to change virtually every aspect of the lens/film
relationship, including: lens-to-film distance, vertical and horizontal
displacement, and angular relationship. Because of this flexibility, you
have almost limitless control over the ground glass image. You can enhance,
change or exaggerate image size, shape, sharpness, depth of field, and
apparent perspective. In addition, you can shift the placement of the main
subject within the borders of the ground glass without having to move the
camera, allowing you to fine-tune composition even after the camera position
has been established.
Basic
Swing and Tilt Operations
The
following basic movements are possible in actual use:
1.
Rise and Fall
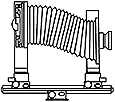
These terms
refer to moving the lens and/or film upward or down ward while keeping
the lens and film planes perpendicular to each other. Upward movement is
called rise, downward movement is called fall. The effect remains almost
identical regardless of whether it is the lens or film holder that is moved.
However, it must be remembered that when the film holder is moved, the
image moves in the opposite direction as when the lens is moved. (This
is also true for all other movements.)
2.
Shift
 "Shift"
(sometimes also called "slide") is movement of the lens and/or film horizontally
while keeping the lens axis and film plane perpendicular to each other.
It is used to move the subject area laterally. "Shift"
(sometimes also called "slide") is movement of the lens and/or film horizontally
while keeping the lens axis and film plane perpendicular to each other.
It is used to move the subject area laterally.
3.
Swing
 Swing
means slanting the lens and/or film holder to the left or right. Unlike
with rise, fall and shift, the lens axis and film plane are no longer perpendicular
to each other. Swing is used to correct or deliberately exagerate distortions
in the (horizontal) linear perspective. Swing
means slanting the lens and/or film holder to the left or right. Unlike
with rise, fall and shift, the lens axis and film plane are no longer perpendicular
to each other. Swing is used to correct or deliberately exagerate distortions
in the (horizontal) linear perspective.
4.
Tilt
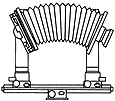 Tilt
means slanting the lens and/or film holder upward or downward. In other
words, "tilt" does for vertical lines what "swing" does for horizontal
lines. Swing and tilt are used to change the depth of field to match the
subject, or to compensate perspective lines for correct image size. Since
each of these basic movements can be performed by moving the front and/or
back of the camera, there are 16 possible patterns using the four movements.
In actual work, a combination of two or more of these movements is often
used to obtain the proper effect for each photograph. Tilt
means slanting the lens and/or film holder upward or downward. In other
words, "tilt" does for vertical lines what "swing" does for horizontal
lines. Swing and tilt are used to change the depth of field to match the
subject, or to compensate perspective lines for correct image size. Since
each of these basic movements can be performed by moving the front and/or
back of the camera, there are 16 possible patterns using the four movements.
In actual work, a combination of two or more of these movements is often
used to obtain the proper effect for each photograph.
Vertical
Perspective Control
Useful
when photographing buildings from a low angle.
If the camera
is pointing upward. . .  and the subject looks like this on the ground glass (converging vertical
lines). . .
  remember, the image will be upside down.
-
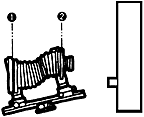
1. Tilt camera
back parallel to the face of the subject to correct perspective.
-
2. Tilt camera
front parallel to the back to correct sharpness.
Refocus
if necessary and . . . 
The subject
will look like this. The perspective is corrected.
Horizontal
Perspective Control
Useful
in architectural, still life and product photography.
 If
the camera is pointing at a slight angle to the subject. . . (top view) If
the camera is pointing at a slight angle to the subject. . . (top view)
 And
the subject looks like this on the ground glass (converging horizontal
lines). . . And
the subject looks like this on the ground glass (converging horizontal
lines). . .
-
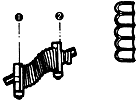
1. Swing the camera
back parallel to the face of the subject to correct perspective.
-
2. Swing the front
parallel to back to correct sharpness.
-
Re-focus if necessary
and . . .
 The
subject will look like this. The perspective is corrected. The
subject will look like this. The perspective is corrected.
Vertical
Image Placement
Improves
composition, eliminates reflections.
 If
the subject looks like this on the ground glass... If
the subject looks like this on the ground glass...
 ...or
like this... ...or
like this...

Use the front
rise or fall or the back rise and fall, and . . .
 The
subject will look like this, properly composed. The
subject will look like this, properly composed.
Horizontal
Image Placement
The
Horizontal Image Placement is used for the same purposes as Vertical Image
Placement.
 If
the subject looks like this on the ground-glass... If
the subject looks like this on the ground-glass...
 ...or
like this... ...or
like this...
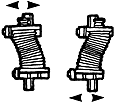 Use
the front lateral shift or the back lateral shift, and . . . Use
the front lateral shift or the back lateral shift, and . . .
 The
subject will look like this, properly composed. The
subject will look like this, properly composed.
Depth-of-Field
To
control depth of field with the camera.

To achieve
maximum depth-of-field from the front of the subject to the back. . .

Tilt front
of the camera forward, and stop down as necessary to achieve desired effect.
The swings are used to control depth of field on the left to right subject
plane. The swings and tilts on the back of the camera can also be used
to control depth-of-field.
Continue
to Part III
Back
to Top |

 "Shift"
(sometimes also called "slide") is movement of the lens and/or film horizontally
while keeping the lens axis and film plane perpendicular to each other.
It is used to move the subject area laterally.
 Swing
means slanting the lens and/or film holder to the left or right. Unlike
with rise, fall and shift, the lens axis and film plane are no longer perpendicular
to each other. Swing is used to correct or deliberately exagerate distortions
in the (horizontal) linear perspective.
 Tilt
means slanting the lens and/or film holder upward or downward. In other
words, "tilt" does for vertical lines what "swing" does for horizontal
lines. Swing and tilt are used to change the depth of field to match the
subject, or to compensate perspective lines for correct image size. Since
each of these basic movements can be performed by moving the front and/or
back of the camera, there are 16 possible patterns using the four movements.
In actual work, a combination of two or more of these movements is often
used to obtain the proper effect for each photograph.
 and the subject looks like this on the ground glass (converging vertical
lines). . .
  remember, the image will be upside down.


 If
the camera is pointing at a slight angle to the subject. . . (top view)
 And
the subject looks like this on the ground glass (converging horizontal
lines). . .

 The
subject will look like this. The perspective is corrected.
 If
the subject looks like this on the ground glass...
 ...or
like this...

 The
subject will look like this, properly composed.
 If
the subject looks like this on the ground-glass...
 ...or
like this...
 Use
the front lateral shift or the back lateral shift, and . . .
 The
subject will look like this, properly composed.
